Sunday 23 September 2012

National Cupcake Week

Hi everyone!

I have been flying solo this week with the baking as my lovely partner in crime Rosie has been extremely busy starting college and making beautiful displays. But Buns and Roses is still on the cards and we have our next project over the next couple of weeks with a Simon's Cat themed birthday cake with also some other unusual ideas incorporated thanks to the request from Lucy. I will keep you updated as we really need to get pen to paper this week.

So it has been National Cupcake Week this week so I thought it would be a crime not to bake. I chose a neon theme and used some fantastic things in Morrisons at the moment including metallic pink, blue and silver bun cases and neon sugar sprinkles.  I chose to make pink, blue and yellow cupcake batter using gel food colourings, top with vanilla buttercream and then finish with the neon sugar sprinkles. I took these into work and unfortunately they disappeared before I could take a picture. I got couple of pictures of the last one:


I have had the boyfriend to stay this weekend and had a fab weekend shopping and relaxing. But he did remind me that it is his Mum and Dad's silver wedding anniversary on Wednesday. I decided I couldn't not bake something for them so whipped up a quick cake last night. Quite a challenge because I wanted a chilled evening with Xfactor, Cider and of course Luke haha. But I managed to quickly cook up the following:


It is vanilla sponge and mixed fruit jam topped with white regal icing. I used several different floral cutters and my new giant number cutters  to cut of of regal icing and painted them with food colouring and a paint brush. Not the normal approach but I took the idea of painting cake decorations from my lovely friend (who has just moved to Cambodia) Anna's childhood xmas cake decorating sessions. Hopefully it will be a taste success.

Did anyone else bake anything for National Cupcake Week? My next bake may be a cake for a work friends birthday or the Buns and Roses Birthday cake. I will keep you updated with another post coming shortly :)

Samantha Who (Loves to bake)


Monday 17 September 2012

Buns and Roses

Hi everyone!

Sorry for not posting in what seems like forever, a lot has changed since my last post which has been keeping me very busy! I finished university in June and now have a 1st in BSc Mathematics whoo! :D. I made the most of my summer and went on 3 great holidays - Crete, Menorca and Ibiza. Then moved to York in July and am working in a graduate role at Northern Rail as a Data and Information Manager. It has taken almost 2 months to settle in because I have been here there and everywhere over the last few weekends including the Paralympics and V festival, but beside the chaos I am absolutely loving life in York!

3 months without posting has meant I have done a lot of baking and not posted the pictures on here so I will start with a few pictures showing what I have been up to:

Chocolate Fudge formula 1 cake for Luke

Cakes for the Bake Sale at work. Chocolate and vanilla cream cupcakes

Rainbow Macaroons

Lemon Drizzle Cupcakes with Doves

JP's chocolate giant cupcake

Anna's beach themed leaving cake


Ash's Mr Bump birthday cake

Rainbow inside of Ash

Danielles Sweet Cake

Dad's Garden Cake

Summer Trifle
I hope you like them. Luke's Formula 1 cake has been my biggest accomplishment so far I think along with Ash's Mr Bump which my lovely sister helped me with. I am hoping I have passed the baking bug onto Charlotte too :).

More recently I have joined baking forces with the lovely Rosie Artley produced a cake for her Mum and Dad's wedding anniversary, the masterpiece in the picture below:


A 3 tier cake requiring an awful lot of mix! But the effort and the burn to my right arm was worth it :) from the reaction when we wheeled it out.

 After the success of this cake me and Rosie have decided to go into business together as "Buns and Roses" ( thought of by me :)) as Rosie is currently training to be a florist. So this is my next big baking adventure!!!!!  We already have our first order together and its a wedding cake eee! I've had a meeting with the lovely lady who has ordered it and we have drawn up a design and have been asked to do it for the 27th October so not long to get it sorted but we are both very excited and keeping hush hush so not to spoil the suprise.  (We will document the process though with pictures for you all)

Because we are going to business there may be a few changes to this blog when we do, it may become the blog for Buns and Roses but we will see. So keep reading as I promise to post regularly now, with the progression of the cake and the business. You will also see us (Buns and Roses) appearing on Facebook in the coming months so if anyone has any upcoming birthdays/weddings/parties, Rosie and I would both be happy to have a chat with you and draw up the perfect cake and/or cupcakes.

So watch this space!

Samantha Who (loves to bake)

Tuesday 5 June 2012

Jubilee Trifle Chocolate Cups

Hey guys
 

Sorry long time no post! I have finally finished my exams, assignments and dissertation, everything is in and university is over! The last 4 years have flown by and I am quite sad that it's all over. Today is the first day that I have done nothing in a while and I am actually quite bored! But I am very much looking forward to my holiday in a few weeks time. CRETE!
Anyway, on to the baking. For the Queen's Jubilee I decided to do a twist on something traditionally British. . . . Trifle. I made Raspberry Trifle in chocolate cups.  To do this I got my silicone cupcake cases that the lovely Steph and Andrew Artley (Lucy and Rosie 's Mum and Dad) bought me. I have 12 in total and 4 tea cup moulds. I used 450g of melted chocolate and painted it into the inside of each case using a teaspoon. After leaving in the fridge for an hour I repeated this with another 450g of chocolate and left to set again in the fridge for another hour. I could then peel away the silicone and was left with chocolate cups. I then placed trifle sponge and fruit cocktail in the bottom of each cup and filled the cup half way with Raspberry Jelly made from jelly cubes. (I had to leave the jelly to cool slightly before putting in the cups as the chocolate could have melted). I then made custard using instant custard mix and left to cool slightly, I then spooned this into the cups up to the top.  Now for the cream... I whipped up double cream and tried to fashion it on top of the cups and added decorations and sprinkles:


Very British

Chocolate Trifle Cups with icing union jack and decoration

Trifles in teacups <3

 My next plan is my boyfriends birthday cake next Tuesday, I don't have a clue how I am going to decorate it? I just know it has to be chocolatey haha! I will blog about that next week :)

Samantha Who (loves to bake)

Tuesday 8 May 2012

TUTORIAL TUESDAY : Pina Colada Cupcakes

Hi there Pi-ettes!

I am writing after a very busy weekend, workwise and party wise! As you all know it was the lovely Nicky's birthday party on Friday and then I have also been out for the bank holiday too :D. I've also been very busy with uni work and completed one of my three assignments. I have an interview for a job this week as well eeek, so everything is going to continue to be hectic until my exam on the 22nd.

The majority of this blog will be about the baking I did for Nicky. I made her a birthday cake and then I did Pina Colada cupcakes for the party. For her cake I did two plain vanilla cakes sandwiched with buttercream and jam and covered in ready to roll purple icing, see the pics below. I topped it with some lovely icing flower decorations:
1 <3

2, look at all that glitter!! <3


For the cupcakes, I made pineapple sponge cupcakes with the following ingredients 2oz butter, 5oz sugar, 120ml (1 can)coconut milk, 1 large egg, 5oz plain flour, 2tsp baking powder, 425g (1 large can) of crushed pineapple. To make them I just creamed the butter and sugar until fluffy. Beat the egg and coconut together and added to the butter and sugar a bit at a time, it did look slightly curled but ends up okay in the end. I then sifted in the flour and baking powder a little at a time then added the pineapple. The mix makes 12 cakes and can be cooked at 180C for 20mins until springy.


I then made Malibu butter cream. I needed around half a beaker of Malibu to give a good taste, with about 50g Butter and 275g icing sugar. It was incredibly yummy and addictive! I split the mixture into 3 and added a bit of flavored colouring into each, I made one strawberry pink, one lemon yellow and the third orange.

To decorate I cut down some straws, added some cocktail decorations and some cocktail umbrellas and put on some sprinkles and jelly orange and lemon decorations. Its quite a simple (as always) and unique recipe. And I have to admit me and the girls got a bit tipsy making the buttercream haha. I will add a more indepth recipe to the taskbar as usual when I next have time :). Hope you like the pictures below:

Pina Cola - Cupcakes <3 Strawberry and Orange

<3

I have also added a picture of the birthday girl <3 :

The girls at Nicky's Party!

On another note, me and Billie were meant to be at a cupcake class this weekend but unfortunately being a Sunday and a bank holiday there were no trains or buses to Worksop :( we are hoping to rearrange, so fingers crossed!!!

After my interview on Thursday I have my Dad's garden cake to do so I will be posting about that at the weekend/at the beginning of next week.

Ciao for now,
Samantha Who (loves to bake)

Tuesday 1 May 2012

TUTORIAL TUESDAY : Caramel Cheesecakes

Good evening!

I promised I would re introduce the Tutorial Tuesdays after a few weeks AWOL and this week its going to be Mini Caramel Cheesecakes <3. I have made full sized caramel cheesecakes before but wanted to use the mini star shaped tins my sister got me for xmas again (they last featured when I made the mini black forest gateaux).  I trawled the internet trying to look for recipes to use and they are either way too complicated or use american ingredients for which direct substitutes aren't available here. So I kind of made it up. The response from the boyrfriend wad the base wasnt really cheesecakey as I used ginger nuts so feel free to substitute for digestives as they give a more 'cheesecakey' base as he put it.

The full recipe if you want to make these has been added to the task bar at the top, but for a taster here are the basics:

So I started with greasing the mini star tins, you could do this in muffin tins but I think you would have to grease them well. Then preheating the oven to 170 degrees.

I then made the bases by mixing 240g of biscuit crumbs with 4tbsp of light brown soft sugar and 70g melted butter. (its easy to make biscuit crumbs by putting the biscuits in a see through food bag and rolling with a rolling pin.) I then packed the crumbs evenly between the tins and put in the oven for 5 minutes.

To make the filling I creamed 450g cream cheese then added 1 teaspoon of vanilla essence, 30g sifted flour and 200g of light brown sugar and stired well. I then added two eggs one at a time stiring well. The mix was then shared equally between the tins and put in the oven for 20 min (until set).

When they were cool I spread a layer of dulce de leche on top and sprinkled on a few pieces of chopped up snickers.

And volia :
Caramel Cheesecakes - Picture taken by the lovely Chris Green (Luke's flatmate)

So thats it, they are pretty simiple and I think they could wow at a dinner party? Tommorow I am making Nicky's Birthday Cake so I will let you know how it goes :), fingers crossed. I will probably post again Saturday about the cake and cupcakes for Nicky's Party and then I've got the cupcake decorating class to look forward to on Sunday :D.

Ciao for now,
Samantha Who (loves to bake)

Saturday 28 April 2012

Upcoming baking and posts.....

Hello again!

 I am finally free after handing in my dissertation yesterday. I say free but I actually have three assignments to be getting on with eek! Well today is a chill out day as a reward of finally finishing my dissertation so I thought I would blog :)
The next few weeks will be busy weeks for me. I have 4 weeks left at uni then it is all over, which is pretty scary and means I have to start looking for jobs :S. I did online numeracy and verbal reasoning tests for one job yesterday so I am getting there and have applied for another which I am looking forward to hearing back from. Its a shame I can't spend my life baking cakes, I can always dream.
But thats not all for the next few weeks, I am also going to be busy with baking <3.
Firstly, next week is my lovely flatmates 22nd birthday party, so I am baking a cake for her to keep at the house and some cupcakes to take to the party. I have a few ideas already but she's quite creative herself so I can imagine that she will have a few ideas for the cupcakes so I will post on here when they are done :).
Secondly, next Sunday me and my lovely baking friend Billie are going on a cupcake decorating course in Worksop. It was my Christmas present to her and we are finally getting round to going. I am so excited and can't wait to learn a few new things. I will review the class also on here the following week :).
Thirdly, May the 12th is my amazing Dad's Birthday so I will be making a cake. I picked up some cute garden gnome candles so thought a garden related cake would be perfect for him. BUT and it's a big but as I love using ready to roll icing, he doesn't like it. Therefore I have the challenge of decorating the cake using as little as possible. I think it will be a challenge but I have drawn something up already so I have a few thoughts.
Finally, I am itching to bake the Bakewell cake that featured on last weeks Saturday Cookbook. I have got really into that programme and LOVE Nadia! As I am busy with work I have to find an excuse to bake it, so I think I may have fatten up the bfs flatmates again haha.

So as you can see the next few weeks are going to be busy, but there's also lots of things for me to blog about, so my next blog will be this weeks TUTORIAL TUESDAY and the Mini Caramel Cheesecakes. But today I will leave you with a few pictures of the cakepops I did last week, I used vanilla flavoured cake for them and have to say I think they are yummier than the chocolate ones. To decorate them I ordered some red candy melts off ebay which were great but also tried experimenting with some Tescos own dark chocolate which was a bit thick, I had to add vegetable oil to thin it. I also used the normal Silverspoon Strawberry, Orange and White chocolate, see what you think:


Vanilla Cakepops - I love the ones with sprinkles best

And again <3
Be back Tuesday lovelys,
Samantha Who (loves to bake)

Monday 23 April 2012

Sorry ...... I Am Back Now :D

Hey there Pi-ettes!

Sorry I have been AWOL over the last few weeks. I can now say the fear has set in at university and I have been working very hard to get my dissertation done as well as all my other work. Anyway it's due in on Monday then I have 3 assignments and an exam then it is all over, very scary!

Anyway even though I have been exceptionally busy I have still managed to have two baking sessions, 1) Mini Caramel Cheesecakes and 2) Vanilla Cake Pops. These will appear properly in upcoming posts but here are some pictures to get your mouths watering haha:

Caramel Ginger Cheesecakes

Vanilla Cake Pops


I am hoping to be back  a week on Tuesday for the next Tutorial Tuesday  :D and may even be back posting again this weekend once my dissertations sent for print :).

While I am here I am going to get sorted with all these award things the lovely Lucy keeps nominating me for:

Firstly, today I will do the One Lovely Blog award:


So there are a couple of rules:

1. Nominate 15 fellow bloggers. 
2. Share 7 random facts about yourself. 

So my random facts:
1) I have recently been retracing my family tree.
2) I wish I could pull tattoos off like my lovely sister.
3) I love being a 'Ginger'
4) My Kindle accompanies me on all long journeys.
5) I am addicted to shopping on Ebay.
6) I am honestly quite strong for a girl and enjoy doing weights.
7) My personal best for 5k is 28 mins (not amazing I know)

My 15 ( I don't have 15 favorites) so 5 bloggers are:


1) Lucy
2) Rosie


Anyway moustache (must dash haha),

Samantha Who (loves to bake)


Wednesday 28 March 2012

TUTORIAL TUESDAYS: Russian Doll Cake Pops


Hey again everyone!
Sorry that it's not actually Tuesday when I am posting this. Before I did this tutorial I wanted to make some more cake pops so I could produce better instructions. After doing them again I believe I have mastered the art of making and covering the pops, it's just the decorating bit that I need to perfect now as it is quite fiddly. Practice makes perfect though :D
So with all the sunshine at the moment it is hard to resist sitting outside but I have been quite good doing work and am sat in the library again today :(. We are having a girls night out tonight though so that's something to look forward to!

Anyway on to the tutorial:
1) Use 4oz margarine, 4oz self-raising flour, 4oz caster sugar and 2 tablespoons of cocoa to produce a cake mix, put in a 19inch tin and cook on 170 for 25 mins.

2) Leave to cool in the tin for 10-20 mins then take out of the tin and leave to cool properly for a few hours. I didn't find any problems in putting it in the fridge.

3) Use a food processor to blend the cake into crumbs. Whilst mixing 85g of cream cheese and 140g of icing sugar together in a bowl.

4) Add the mixture to the cake crumbs and combine until it is fully incorporated and the mixture is moist.

5) Use scales to measure out 1oz of the mixture. Split this into 0.3oz and 0.7oz bits and roll each bit into a ball using your hands. The smaller ball will be the head of the Russian doll and the larger ball will be the body. Repeat this until the mixture is used up. The recipe I used initially said this mix produced 20 cake pops, I have made this twice and got 18 each time.

6) Put on a plate in the fridge and leave for a few hours.

7) Get 150g of coloured or plain chocolate. For this I used 1 and a half bags of Silverspoon's orange chocolate buttons. These can be found in most Sainsbury's and I presume other larger supermarkets.  Melt the chocolate slowly in the microwave for 20 seconds at a time stirring for 10 second in between so the chocolate doesn't burn.

8) Once the chocolate is a smooth consistency, take a few of the heads and bodies out of the fridge on a plate. Dip the head into the chocolate and stick to the body. Do this for all and then return to the fridge. Then take a few more out and repeat the process until all of the heads are stuck to the bodies and they are back in the fridge.

9) Remove the few you first stuck together from the fridge. Then get 18 lolly sticks and put the end of one (about 1cm) into the chocolate and then into the cake pop. Leave them to set for around a minute.

10) Holding the end of the stick dip the cake pop into the bowl of chocolate to cover the cake pop. Use a spoon if necessary then shake the pop gently to remove excess chocolate. Stand in polystyrene or an upside down colander to set for around 15-20 mins. Do this for the rest of the pops.

(Keep stirring the chocolate so that it remains smooth. If it gets a little hard put back into the microwave for a few seconds)

11) Once all the pops are covered and set comes the fiddly part the decorating. Break up and melt around 40g of white chocolate in a small bowl as before. Use a teaspoon of the chocolate and dip the front of the head gently onto the spoon for the faces. Do this for all pops and let dry.

12) Then use edible pens to draw on the faces and decorate. I bought a red and a black pen the other day so I will review these in a blog this week :). If you don't want to use pens you can use black food colouring and a paint brush to paint on the features. Do not use other colours of food colouring as I have found red and pink turn a funny brown colour.

13) Leave to set for about half an hour and voila:

Singular Russian Doll

Group in Polystyrene

Sorry about the mess, chocolate runs everywhere!

As you can see Some of the faces were quite hard to do, especially applying the white chocolate. Never the less I am fairly happy with them and no doubt will give them another shot soon.
I will again put a full clearer recipe on the task bar at the top. So why not give it go? Lolly sticks can be bought of Amazon :D


Samantha Who (Loves to Bake)


Saturday 24 March 2012

Cake Pop Update and Cake Related Gifts :D

Hey everyone!

I haven't felt the urge to blog in a few days but I am finally getting round to it :) I am at home now with the family and have been up to Flamborough for food and a walk with my sister. I am sooo tired now though after all that sea air!

So I attempted cakepops on Wednesday/Thursday. And it is a lot harder than I thought it would be. There are so many parts to the process and its very time consuming. 

 I began on Wednesday night by making a cake. I made a small chocolate cake in a 19inch cake tin. I then left this to cool and bobbed it in the fridge over night. 

The next morning I put the cake in a food processor to produce crumbs, I then mixed these with a combination of icing sugar and cream cheese to produce a moist mixture. I did think the recipe that I used did not use enough cream cheese which meant the mixture was slightly crumbly and caused problems further on. Next time I will use more cream cheese.  I then weighed out 1 oz onto the digital scales and rolled it into a ball. I repeated this and put then balls in the fridge to set.

That afternoon I melted white chocolate in a bowl in the microwave and took the balls out of the fridge. I then dipped the end of a lolly stick into the chocolate and inserted it into a ball and dipped the ball into the chocolate to cover it. I then used sprinkles to finish it off. I did this for all the cake balls :). However, I found some of the balls hard to cover and they crumbled off the stick whilst in the chocolate, I think this was for a number of reasons:

1) As mentioned before there was not enough cream cheese in the mix.
2) The balls warmed up and began to crumble, so it might be best to only take a couple out of the fridge at a time.
3) The chocolate sets very quickly so can get sticky and gloopy and be hard to apply to the pop. Next time i'm going to keep an eye on the consistency and put back in the microwave if necessary.

Although some did not turn out excellent , a few were pretty good and here are the results:


Cakepops with sprinkles

Russian Doll Cakepop, decorated with food colouring


Cake pops 2

As you can see I also used some strawberry chocolate for some of the pops. Its made by Silverspoon and can be found in Sainsburys in the baking aisle. I also have some orange flavour. It is quite expensive though at just under a pound for 100g (you need around 500g for 20 pops). They are quite hard to store once made. I got a small cardboard box and put holes in it with a skewer.

I think that I will be giving cake pops another go. I find that if I aren't totally happy with something, I will keep trying. I am hoping to be able to post pictures of some more successful  pops in the next month :).  I will be doing a tutorial of the basic method and techniques in next weeks TUTORIAL TUESDAYS post so something to look forward to!

On another note my sister has bought me a couple of cake related things whilst I have been away:

The first is a cool cupcake display/carry case which fits a single cupcake in. The bottom part of it is a silicone mould which can go in the oven. The top part is hard see through plastic lid which twists on. This means that you can ice the cupcake creatively  and the casing will protect it. I think it would look amazingly cool in my lunch box.

The second present was a 100 piece cupcake decorating kit including icing bags and nozzles. These sort of nozzles look to be best for intricate designs and writing. The set also includes number and letter stamps which can be pressed into regal icing and then provide outlines to follow with icing. It also includes some other stencils in fancy shapes.

See the pictures below for both:

Cupcake Carrier
100 Piece Cake Decorating Set

Anyway that's it for today, hope you are looking forward to TUTORIAL TUESDAYS and maybe some more cakepops next week :) 

Samantha Who (loves to bake)


Tuesday 20 March 2012

TUTORIAL TUESDAYS: Two Tier Birthday Cakes

Hi guys!

It has been a few days since I blogged, I aren't as busy with work this week but am ill :( so still a stressy week! I am going home to visit the family on Friday though, which I am very much looking forward to as it feels like forever since I have seen my sister. But anyways no uni for me today as I feel pants eughh! 

Sooo some blogging is in order instead.  I am going to try something new out with my blog and this is going to be TUTORIAL TUESDAYS <3. Where every Tuesday I write a post on something I have made and add a recipe to go alongside it. That leaves me free to blog about other things in the world of baking during the week. Simples :).

This weeks Tutorial Tuesday:
 I haven't made anything since the St Patrick's day cupcakes on Friday but I am planning my first attempt at cakepops Thursday evening so wish me luck and I will update you later in the week :). So today I am going to blog about something I have/can already made ..... Two Tier birthday cakes.

I had a crack at these at the end of January  as it was one of the girls birthdays (Aasha) and one of Luke's flat mates birthday also (Jamie). I didn't really follow any recipes for these I just used my own imagination and the normal vanilla sponge mix. It was easier than I thought just very time consuming, especially as I was doing cupcakes at the same time on both occasions (why is everyone born in January/February? And what was special about about April 1989? haha). 

So here's the tutorial, I will talk through the basics and put the main recipe up as usual on the task bar at the top of the page :) :

1) I needed a lot of cake mix for these, I used 2 x the normal 6oz, 6oz, 6oz, 3 eggs mix, (which I use in most of my recipes) to fill two 21 inch cake tins. I then put them in the oven on 170 for 40-50mins. These make the bottom tier when sandwiched together. 

2) I then used 8oz self raising flour, 8oz caster sugar, 8oz margerine, 4 eggs and some vanilla essence to fill a 19 inch cake tin and put it in the oven for the same amount of time.

3) Once they were cooled I leveled off each cake with a sharp knife. 

4) I then took the 19inch cake and placed a cereal/soup bowl upside down on top of it and cut around it. There was quite a bit of spare cake but this can be used for cake pops :) (see my next blog later this week). This then made my top tier.

Now onto decorating, the more interesting part :)! 

5) I made 3 times the normal butter cream mix (again used in most of my recipes, starting to see the pattern? It's all about making it simple. Simples? :) ). 

6) I then sandwiched together the 21 inch cakes with jam and butter cream to make the bottom tier and place it on a cake board.

7) I then covered the top and the sides of complete first tier and the smaller tier in buttercream using a pallet knife (these are really the best thing for the job) and smoothed it out nicely. 

8) Now for the regal icing (ready to roll) I buy this off Ebay as its cheaper (around £1.80 for a 250g) but you can buy bigger blocks 1kg of plain white icing from Tesco for around £2.oo and colour it yourself with food colouring. I used 1 & 1/2 250g blocks for the bottom tier and about 3/4s of a 250g block for the upper tier. 
Tip: I think it works better to use two different colours for the tiers :)

To apply the regal icing, I first sprinkle the worksurface with icing sugar and also cover a rolling pin. Then use the rolling pin to roll out the icing. Once I think it's big enough to cover my cake I gently and very loosely wrap the icing around the rolling pin, this makes it easier to apply to the cake. 

9) Hovering the rolling pin above one side of the cake. I unravel the icing a little so it touches the work surface and slowly unroll the icing over the cake. Once its in place I cut off any excess with a sharp knife and smooth the icing using my hands or an icing smoothing tool (smoothing may take a while to get it perfect, don't be too rough).

10) I applied regal icing to both tiers and then placed the smaller tier on top of the bigger tier. I always thinks its a nice touch to add ribbon around the bottom of each tier at this point. I normally buy 5cm ribbon from Ebay and secure the ends to each other using a pin or sellotape.

11) It is then up to you how you decorate them. I tend to cut letters out of the leftover regal icing, use sweets and also use curling ribbon (the stuff used on presents at Christmas, available from Ebay and Paperchase) and skewers to make fancy decorations.


Heres photos of the two I have done recently:

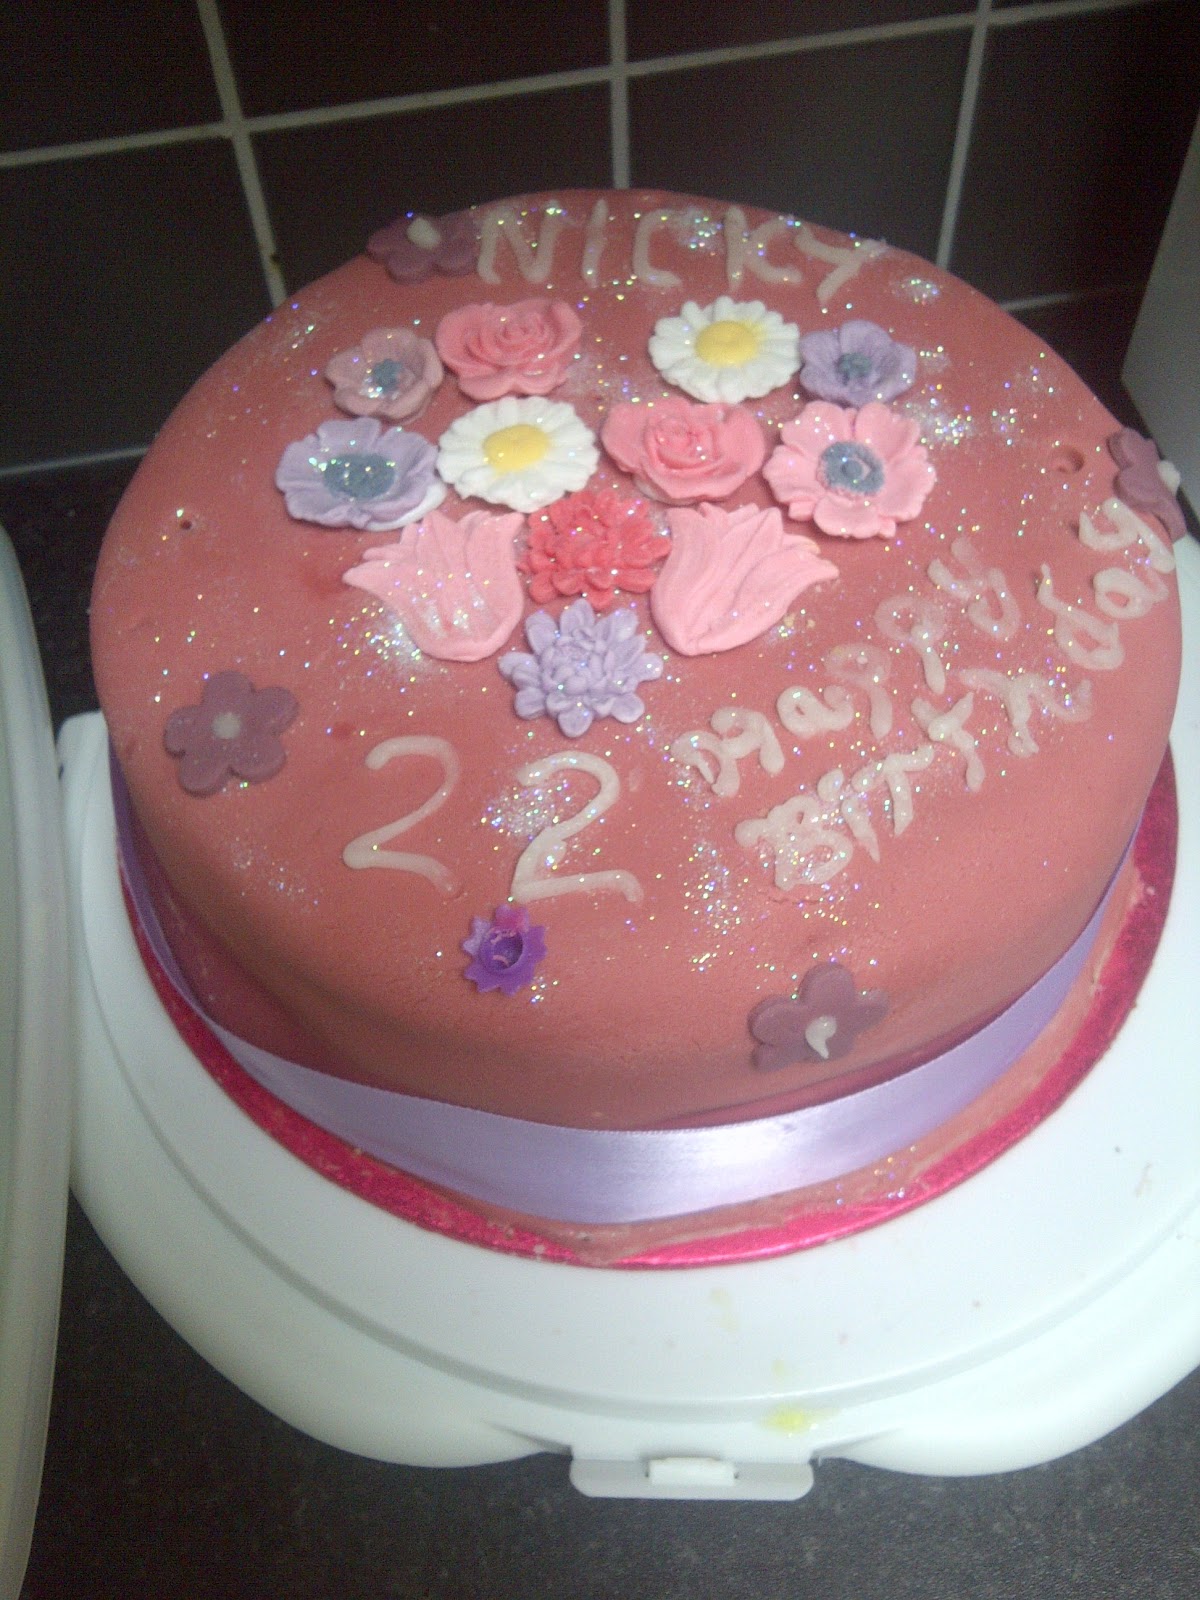
Aasha's finished cake (Flowers, dragonfly and Ribbon not edible)

Close-up

Jamie's Cake

Thanks for the read, keep your eyes out for more Tutorial Tuesdays as there will be many more :)
Until next time,
Samantha Who (loves to bake)